How to take part in the round for circular knitting
How to take part in the round for circular knitting
Casting is the same for round needles as for straight needles. The only difference is that your pattern usually says something like “join stitches in the round, taking care not to twist the stitches”.
What does this mean and how do you do it? It’s actually very simple, but you have to be careful because it’s also easy to get a twist in your knitting.
No twisting
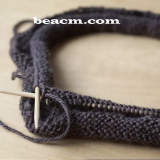
The first key is that you need to look at all the stitches you have thrown at and make sure that they are all aligned equally on the needle.
This means that all the small loop pieces that are created when casting on the stitches should be on the inside of the circle that the circular needle forms without twisting the edge. Then you can make the connection and knit while your pattern is laying out.
If you don’t do this properly, you will notice it quite quickly because your knitted tube is not straight. Unfortunately, the only way to correct such a twist is to tear it out and start over. So make sure you get it right the first time.
Of course, you can always use the twist as a design feature, like the artificial Mobius Infinity scarf. But that won’t work for your socks, mittens and hats.
How to participate in the round
There are different methods to join a project in the round. Some people simply start knitting by using the slip knot or the first stitch (whatever the case may be) as the first stitch.
You can also strike one stitch more than your pattern requires. You will then slip this stitch onto the left needle and knit the first and last stitch together before you start the pattern.
A third option is based on the second and works very quickly while a nice, clean connection is made:
- Slide the last stitch (i.e. the first stitch) from the left needle to the right needle.
- Then lift the second stitch on the right needle (the last applied) over the first stitch and onto the left needle.
- Pull it tight and start knitting with the stitches on the left side of the needle.
Mark the end
The biggest problem with knitting in the round is remembering where the round begins. Therefore, a stitch marker is very important when you are working in the round.
Place a stitch marker on the right needle before you start knitting, but after you have made the connection when you cross stitches. This marks the end of the line so that you can better follow your pattern.
Because a stitch marker held on the needle can fall off if you stop knitting immediately after, you may want to place the marker before the last stitch. Many knitters also knit the first stitch of the next round before they stop knitting. You just need to remember that you did this when you resumed knitting.
Alternatively, you can use a stitch marker that can wrap around a stitch instead of living on the needle. You should move it up every few centimetres so that you can still see it, but this makes it easier to lose it if you stop knitting as soon as you slip.